The Exoid needs to be connected to a computer with the Exoid control suite installed (latest version can be found here) in order to be operated:
- Connect the power cable to the back of the Exoid, ensuring that the power switch is in the off position.
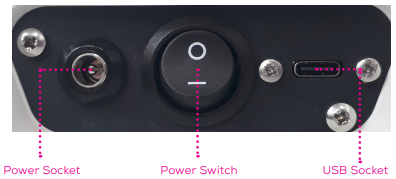
- Connect the USB-C cable to the port on the back of the Exoid and to the computer to be used with the instrument, then turn the power switch on.
- The light on the Exoid will turn red when powered on, the APS will reset position and the stretcher will run a self calibration.
- Open the Exoid control software, if the instrument does not automatically connect, click on the icon beneath the instrument to open the connections list. If one or more modules is plugged in but has not connected, click on the connect button for the relevant module. If there is no driver version number listed in the drop down box, one or more of the Exoid control drivers may not have installed (the latest version of the drivers can be found here)

- The light on the Exoid will change to white when the instrument is set up and ready to start measurements. If the Exoid has not connected at this point, a simple method of re-establishing the connection between the Exoid and the computer is to disconnect the USB-C from the port on the side of the instrument, turn off the power switch, reconnect the USB-C cable, and restart the software.